Couchbase Server on EC2
Running Couchbase Server on EC2 gives you full control over your database infrastructure while leveraging AWS's reliable cloud platform. This is ideal for organizations that prefer self-managed deployments over Capella's managed service.
EC2 Instance Requirements
Instance Sizing
- Minimum:
t3.smallort3.medium(avoid micro instances) - Recommended:
t3.largeorm5.largefor better performance - Production:
m5.xlargeor larger based on workload requirements
Why not micro instances?
- Insufficient memory for Couchbase services
- Poor I/O performance for database operations
- May cause stability issues under load
Operating System Support
Couchbase Server supports multiple Linux distributions on EC2:
- Amazon Linux
- Ubuntu
- RHEL/CentOS
Amazon Linux 2 (Recommended for EC2)
- Optimized for AWS infrastructure
- Built-in AWS integrations
- Regular security updates from AWS
Amazon Linux 2 AMI (HVM), SSD Volume Type
Instance: t3.large or larger
Storage: 20GB+ GP3 SSD
Ubuntu Server 20.04 LTS or 22.04 LTS
- Long-term support versions
- Wide community support
- Familiar for many administrators
Ubuntu Server 22.04 LTS (HVM), SSD Volume Type
Instance: t3.large or larger
Storage: 20GB+ GP3 SSD
Red Hat Enterprise Linux or CentOS
- Enterprise-grade stability
- Corporate support available
- Common in enterprise environments
RHEL 8.x or CentOS 8 (HVM), SSD Volume Type
Instance: t3.large or larger
Storage: 20GB+ GP3 SSD
Security Group Configuration
Required Ports for Couchbase
Configure your EC2 security group to allow the following ports:
Properly configuring security groups is essential for both functionality and security. Missing ports will prevent FHIR CE from connecting to Couchbase.
Inbound Rules:
| Port Range | Protocol | Source | Purpose |
|---|---|---|---|
8091-8096 | TCP | Custom IP or 0.0.0.0/0 | Couchbase Web Console & APIs |
11210-11211 | TCP | FHIR Server IP | Couchbase Client Connections |
18091-18096 | TCP | Custom IP or 0.0.0.0/0 | Couchbase SSL Ports (if using SSL) |
80 | TCP | 0.0.0.0/0 | HTTP (for FHIR server communication) |
443 | TCP | 0.0.0.0/0 | HTTPS (optional, for secure access) |
22 | TCP | Your IP | SSH Access |
- 🧪 Development Setup
- 🏥 Production Setup
For Development/Testing:
Source: 0.0.0.0/0 (Allow from anywhere)
- Convenient for development and testing
- Not recommended for production
- Easy to set up and troubleshoot
For Production:
Source: FHIR Server IP/32 (Specific IP only)
Source: Your Admin IP/32 (For web console access)
- More secure approach
- Requires knowing exact IP addresses
- Recommended for production environments
Installation Process
Step 1: Download Couchbase Server
Visit the official Couchbase downloads page: https://www.couchbase.com/downloads/?family=couchbase-server
Choose the Enterprise Edition package that matches your EC2 instance's operating system.
Step 2: Install Based on OS
- Amazon Linux Installation
- Ubuntu Installation
- RHEL/CentOS Installation
# Download the RPM package (replace with latest version URL)
wget https://packages.couchbase.com/releases/7.2.4/couchbase-server-enterprise-7.2.4-amzn2.x86_64.rpm

# Install Couchbase Server
sudo rpm -ivh couchbase-server-enterprise-7.2.4-amzn2.x86_64.rpm

# Start Couchbase Service
sudo systemctl start couchbase-server
sudo systemctl enable couchbase-server
# Download the DEB package (replace with latest version URL)
wget https://packages.couchbase.com/releases/7.2.4/couchbase-server-enterprise_7.2.4-ubuntu20.04_amd64.deb

# Install Couchbase Server
sudo dpkg -i couchbase-server-enterprise_7.2.4-ubuntu20.04_amd64.deb

# Fix any dependency issues
sudo apt-get update
sudo apt-get install -f

# Start Couchbase Service
sudo systemctl start couchbase-server
sudo systemctl enable couchbase-server
# Download the RPM package (replace with latest version URL)
wget https://packages.couchbase.com/releases/7.2.4/couchbase-server-enterprise-7.2.4-rhel8.x86_64.rpm

# Install Couchbase Server
sudo rpm -ivh couchbase-server-enterprise-7.2.4-rhel8.x86_64.rpm

# Start Couchbase Service
sudo systemctl start couchbase-server
sudo systemctl enable couchbase-server
Couchbase Configuration
Access Web Console
After installation, access the Couchbase Web Console:
http://YOUR-EC2-PUBLIC-IP:8091
Find your instance's public IP in the AWS EC2 console or run:
curl http://checkip.amazonaws.com/
Setup Process
The Couchbase configuration process is identical to the Docker setup:
- Setup New Cluster
- Create Administrator Credentials
- Configure Services (Data, Query, Index, Search)
- Set Memory Quotas
- Create FHIR Bucket(s)
Follow the same steps as described in the Couchbase Docker guide for detailed configuration instructions.
EC2-Specific Considerations
Performance Optimization
Storage:
- Use GP3 SSD for better IOPS performance
- Allocate sufficient storage for your data volume
- Consider separate volumes for data and logs
Networking:
- Use Enhanced Networking for better network performance
- Consider Placement Groups for multi-node deployments
- Monitor network utilization and adjust instance types as needed
Monitoring & Maintenance
# Check Couchbase service status
sudo systemctl status couchbase-server

# View Couchbase logs
sudo tail -f /opt/couchbase/var/lib/couchbase/logs/couchbase.log

# Check memory and disk usage
free -h
df -h
Backup Considerations
- Set up regular EC2 snapshots for your instance
- Configure Couchbase backup using cbbackup or Backup Service
- Consider cross-region backup for disaster recovery
Network Access for FHIR CE
Connection from FHIR Server
Your FHIR CE server will need to connect to this EC2 instance. Ensure:
- Security Group allows traffic from FHIR server IP
- Network ACLs don't block the connection
- Route tables are properly configured
- DNS resolution works (use public IP or Route 53)
FHIR Tenant Configuration
Create the FHIR Bucket
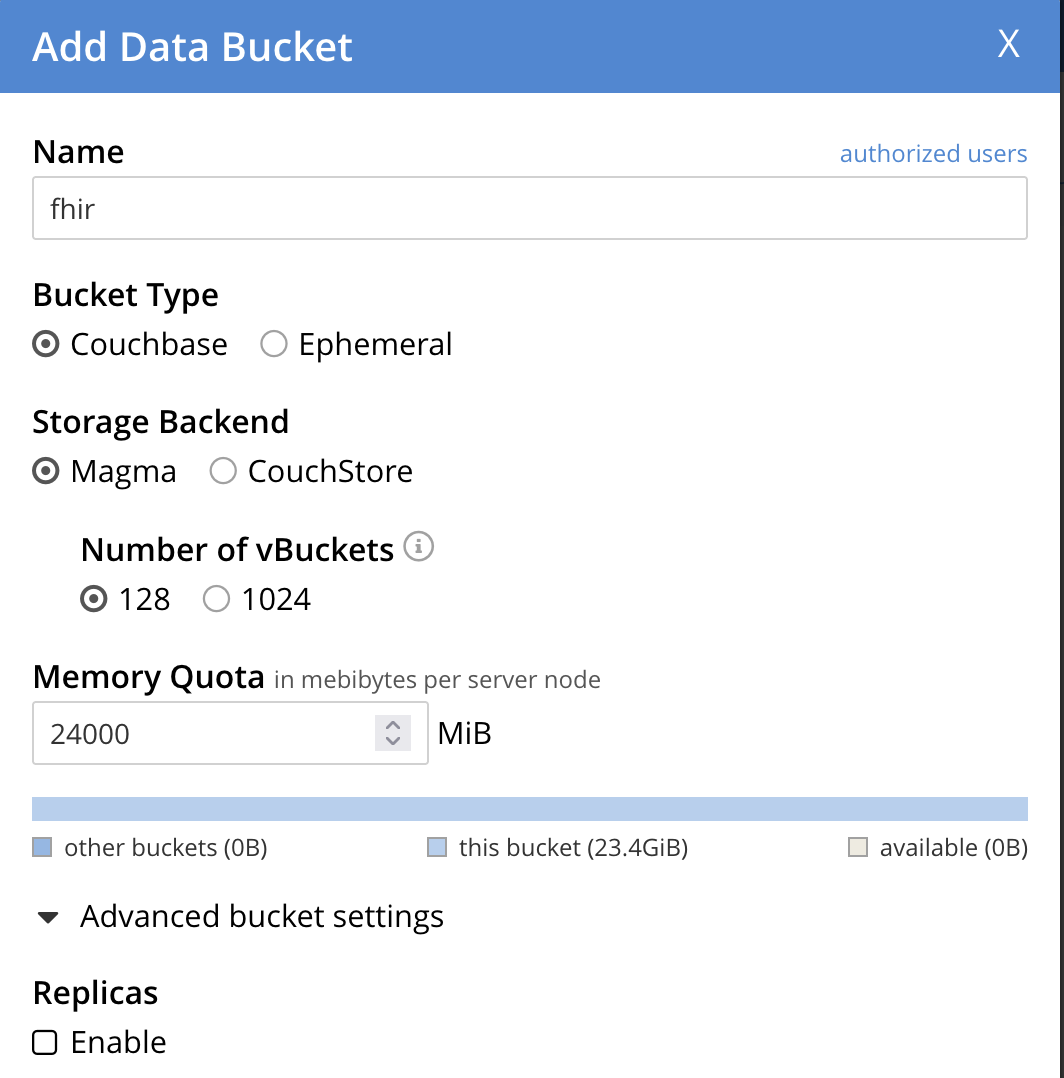
Configure your FHIR bucket:
Bucket Configuration Guidelines:
- Bucket Name: fhir this is fixed
- Memory Quota: Allocate based on your expected data volume
- Bucket Type: Keep as Couchbase (default)
- Replicas: Uncheck (single node)
- Compression: Enabled by default for better storage efficiency
- 🧪 Development Setup
- Production Setup
Recommended Configuration:
Bucket Name: fhir
Memory Quota: 1 GB
Durability: Majority
Compression: Enabled
Perfect for development, testing, and proof-of-concept deployments.
Recommended Configuration:
Bucket Name: fhir
Memory Quota: 4 GB or higher
Durability: Majority
Compression: Enabled
Suitable for production healthcare environments with high availability requirements.
Connection Information
After completing the setup, you'll need these details for your FHIR CE configuration:
When configuring FHIR CE, use your EC2 instance's connection details (example):
connection:
  connectionString: "ec2-xx-xx-xxx-xxx.us-west-2.compute.amazonaws.com"
  username: "Administrator"
  password: "password"
  serverType: "Server"
  sslEnabled: false
Congratulations! Your Capella cluster is ready. Now you can install and configure FHIR CE to connect to this managed Couchbase instance.